从今天开始,就开始把原先学习Testcpp的心得,通过文字的形式记录下来,坚持下去,… 路还很长捏…
好了,现在就开始今天的重点吧-NodeTest,先了解下CCNode.
###下面就来先看看CCNode源码吧:
    //=======初始化相关方法=======//
	virtual bool init();
	static CCNode * create(void);
	const char* description(void);

	//===========以下都是相关set get属性方法===============//

    //zOrder独立于绘制顺序,它仅仅只是记录node在它父类以及相关兄弟之间的排序,其顺序是相对于其父类的子类而言,跟OpenGl的Z vertex没有关系,默认的Z vertex=0.它仅仅影响nodes的绘制顺序,数字越大,绘制越靠后
	virtual void setZOrder(int zOrder);
	virtual void _setZOrder(int z);//只在CCNode中调用,因为调用它不调用setOrderOfArrival方法
	virtual int getZOrder();

	//设置node的Z vertex坐标,默认为0,在CCNode的transform方法中会将Z坐标,赋值到转换坐标上transfrom4x4.mat[14] = m_fVertexZ;
	virtual void setVertexZ(float vertexZ);
	virtual float getVertexZ();


	//当设置Y为负数的时候旋转方向头下脚上,当X为负数时候没相应效果
	virtual void setScaleX(float fScaleX);
	virtual float getScaleX();
	virtual void setScaleY(float fScaleY);
	virtual float getScaleY();
	virtual void setScale(float scale);
	virtual float getScale();
	virtual void setScale(float fScaleX,float fScaleY);

	virtual void setPosition(const CCPoint &position);
	virtual const CCPoint& getPosition();
	virtual void setPosition(float x, float y);
	virtual void getPosition(float* x, float* y);
	virtual void  setPositionX(float x);
	virtual float getPositionX(void);
	virtual void  setPositionY(float y);
	virtual float getPositionY(void);

	//斜切
	virtual void setSkewX(float fSkewX);//默认斜切角度为0
	virtual float getSkewX();
	virtual void setSkewY(float fSkewY);
	virtual float getSkewY();

	//默认瞄点为(0.5,0.5)
	virtual void setAnchorPoint(const CCPoint& anchorPoint);
	virtual const CCPoint& getAnchorPoint();
	virtual const CCPoint& getAnchorPointInPoints();//描点实际像素点坐标
	virtual void ignoreAnchorPointForPosition(bool ignore);//当设置为true的时候,描点还是(0.5,0.5),但是此时是通过起始点(0,0)来定位的,而设置为false的时候,是通过描点定位(0.5,0.5)。特别要指明,如果为true的时候,虽然定位是通过起始点(0,0)来起作用的,但是对于scale,还是通过描点来放大缩小
	virtual bool isIgnoreAnchorPointForPosition();

	virtual void setContentSize(const CCSize& contentSize);//原始节点大小
	virtual const CCSize& getContentSize() const;
	CCRect boundingBox(void);//经过缩放和旋转之后的外框盒大小

	virtual void setVisible(bool visible);
	virtual bool isVisible();

	virtual void setRotation(float fRotation);//x轴,y轴 旋转
	virtual float getRotation();
	virtual void setRotationX(float fRotaionX);
	virtual float getRotationX();
	virtual void setRotationY(float fRotationY);
	virtual float getRotationY();

	virtual void setOrderOfArrival(unsigned int uOrderOfArrival);
	virtual unsigned int getOrderOfArrival();//uOrderOfArrival是为了区分,当设置相同的zOrder的时候,记录谁先add到父类的顺序,通过全局静态顺序变量s_globalOrderOfArrival来赋值

	virtual void setGLServerState(ccGLServerState glServerState);
	virtual ccGLServerState getGLServerState();//glServerState表示OpenGLES服务器端状态


	//==========添加child或者通过tag获取child========//
	virtual void addChild(CCNode * child);
	virtual void addChild(CCNode * child, int zOrder);
	virtual void addChild(CCNode* child, int zOrder, int tag);
    CCNode * getChildByTag(int tag);
    virtual CCArray* getChildren();//->m_pChildren
    unsigned int getChildrenCount(void) const;
    virtual void setParent(CCNode* parent);
    virtual CCNode* getParent();


     ////// 移除child //////
     virtual void removeFromParent();
     virtual void removeFromParentAndCleanup(bool cleanup);//当cleanup为true的时候,会将action停止,包括子类的action也一并停止
     virtual void removeChild(CCNode* child);
     virtual void removeChild(CCNode* child, bool cleanup);
     virtual void removeChildByTag(int tag);
     virtual void removeChildByTag(int tag, bool cleanup);
     virtual void removeAllChildren();
     virtual void removeAllChildrenWithCleanup(bool cleanup);
     virtual void cleanup(void);//Stops all running actions and schedulers

     virtual void setActionManager(CCActionManager* actionManager);//当添加CCActionManager的时候,原先的action都将停止。初始化node时候CCActionManager是通过director->getActionManager()初始化的,当然m_pActionManager也retain()了,所以runAction中的一切action都是当前node的m_pActionManager管理的
     virtual CCActionManager* getActionManager();
     CCAction* runAction(CCAction* action);
     void stopAllActions(void);
     void stopAction(CCAction* action);
     void stopActionByTag(int tag);
     CCAction* getActionByTag(int tag);
     unsigned int numberOfRunningActions(void);


     virtual void reorderChild(CCNode * child, int zOrder);//记录zOrder,在addchild中调用
     virtual void sortAllChildren();//在draw()之前,sort


     //=====网格渲染特效========//
     //在visit方法中,在渲染其他节点时候,事先要判断运行这么几句话
     //if (m_pGrid && m_pGrid->isActive())
 		{
     		m_pGrid->beforeDraw();
 		}
 		结束的时候还有这么几句
 		if (m_pGrid && m_pGrid->isActive())
 		{
     		m_pGrid->afterDraw(this);
		}
     virtual CCGridBase* getGrid();//在对节点应用某些特殊效果时会用到此属性(网格的的数据和渲染基类CCGridBase),其子类CCGrid3D,CCTiledGrid3D
     virtual void setGrid(CCGridBase *pGrid);


     //======数据相关=======//
     virtual int getTag() const;
     virtual void setTag(int nTag);
     virtual void* getUserData();
     virtual void setUserData(void *pUserData);//可以放进指针,数据块,结构体,对象等,注意要release
     virtual CCObject* getUserObject();
     virtual void setUserObject(CCObject *pUserObject);//可以放CCObject数据,加进来的CCObject需要release。

     //=========CCGLProgram=========//
     //引擎提供了CCGLProgram类来处理着色器相关操作,对当前绘图程序进行了封装,其中使用频率最高的应该是获取着色器程序的接口:const GLuint getProgram();该接口返回了当前着色器程序的标识符。后面将会看到,在操作OpenGL的时候,我们常常需要针对不同的着色器程序作设置。注意,这里返回的是一个无符号整型的标识符,而不是一个指针或结构引用,这是OpenGL接口的一个风格。对象(纹理、着色器程序或其他非标准类型)都是使用整型标识符来表示的。
     virtual CCGLProgram* getShaderProgram();
     virtual void setShaderProgram(CCGLProgram *pShaderProgram);//通用以下方法调用node->setShaderProgram(CCShaderCache::sharedShaderCache()->programForKey(kCCShader_PositionTextureColor));每一个渲染的node必须要setShaderProgram,CCGLProgram是从CCShaderCache缓存中获取默认的CCGLProgram着色器程序,当然我们也可以缓存自己的着色器程序。具体关于CCGLProgram着色器类,参考:http://blog.csdn.net/ganpengjin1/article/details/19033195


     virtual CCCamera* getCamera();//所有节点都拥有一个摄像机类CCCamera。只有通过摄像机类,节点才会被渲染出来。当节点发生缩放旋转和位置变化的时候,都需要覆盖CCCamera 类,让这个节点通过CCCamera 类重新渲染。(CCNode 类里有些方法可以实现缩放、旋转和位置变化,当使用摄像机类实现这些的时候,那些方法就不能同时使用了。使用摄像机类也不可以同时使用世界坐标了。)
     Cocos2D-x 中的CCCamera 类使用OpenGL 的gluLookAt 函数来设置位置。gluLookAt 函数有三组关于坐标的参数,其中“Eye”系列的x、y、z 坐标参数是视角的位置,而“Center”系列的x、y、z 坐标参数是所视目标的坐标位置,“Up”系列的x、y、z 坐标参数是摄像机方向的向量坐标。关于这三个参数,你可以理解为以“Eye”为起点,沿着“Up”方向,朝“Center”看。以下分别是CCCamera 类的成员数据和函数。(在三维效果中,使用CCCamera 类是可以的,但是如果你只需要一些二维特效的话,那么更推荐跟随类CCFollow。)

     virtual bool isRunning();//node是否在跑


     //=======lua=========//
     virtual void registerScriptHandler(int handler);
     virtual void unregisterScriptHandler(void);
     inline int getScriptHandler() { return m_nScriptHandler; };
     void scheduleUpdateWithPriorityLua(int nHandler, int priority);


     //=======Event Callbacks===========//
     //如果要复写下面相关类,需要回调他们的父类
     virtual void onEnter();
     virtual void onEnterTransitionDidFinish();
     virtual void onExit();
     virtual void onExitTransitionDidStart();


     //========渲染遍历节点========//
     virtual void draw(void);
     virtual void visit(void);

     //=========定时器==========//
     virtual void setScheduler(CCScheduler* scheduler);//当设置CCScheduler,先前设置的timers/update定时器都将停止,默认是通过director->getScheduler()赋值的
     virtual CCScheduler* getScheduler();
     bool isScheduled(SEL_SCHEDULE selector);
     void scheduleUpdate(void);//每一帧回调一次,priority为0,它只跟update方法绑定,其实scheduleUpdate就是封装了scheduleUpdateWithPriority(0)
     void scheduleUpdateWithPriority(int priority);
     void unscheduleUpdate(void);//解绑update方法
     void schedule(SEL_SCHEDULE selector, float interval, unsigned int repeat, float delay);//this->schedule(schedule_selector(MyNode::TickMe), 0, 0, 0);
     void schedule(SEL_SCHEDULE selector, float interval);
     void scheduleOnce(SEL_SCHEDULE selector, float delay);
     void schedule(SEL_SCHEDULE selector);
     void unschedule(SEL_SCHEDULE selector);
     void unscheduleAllSelectors(void);
     void resumeSchedulerAndActions(void);
     void pauseSchedulerAndActions(void);
     virtual void update(float delta);//每一帧会被自动回调,当scheduleUpdate。在node中的update()具体实现如下:if (m_pComponentContainer && !m_pComponentContainer->isEmpty())
{
    m_pComponentContainer->visit(fDelta);//访问CCComponentContainer的visit()方法
}。m_pComponentContainer是components的Dictionary


     void transform(void);//矩阵转换
     void transformAncestors(void);//父类矩阵转换
     virtual void updateTransform(void);//具体实现在子类中。在CCSprite中,只有当精灵通过CCSpriteBatchNode渲染的时候,该方法才使用

     //CCAffineTransform表示 2D 仿射变换,游戏大量使用的旋转、缩放、平移等都是仿射变换。所谓仿射变换是指在线性变换的基础上加上平移。平移不是线性变换。二维计算机图形学中的仿射变换通常是通过和3×3齐次矩阵相乘来实现的。
      CCAffineTransform结构体代码:
      struct CCAffineTransform {
      	float a, b, c, d;
      	float tx, ty;
	};
     virtual CCAffineTransform nodeToParentTransform(void);
     virtual CCAffineTransform parentToNodeTransform(void);
     virtual CCAffineTransform nodeToWorldTransform(void);
     virtual CCAffineTransform worldToNodeTransform(void);

     CCPoint convertToNodeSpace(const CCPoint& worldPoint);
     CCPoint convertToWorldSpace(const CCPoint& nodePoint);
     CCPoint convertToNodeSpaceAR(const CCPoint& worldPoint);
     CCPoint convertToWorldSpaceAR(const CCPoint& nodePoint);
     CCPoint convertTouchToNodeSpace(CCTouch * touch);//将触摸点转换成node坐标
     CCPoint convertTouchToNodeSpaceAR(CCTouch * touch);
     void setAdditionalTransform(const CCAffineTransform& additionalTransform);

     cocos2d-x 坐标研究:http://blog.163.com/zjf_to/blog/static/201429061201292193855498/
     CGAffineTransform:https://developer.apple.com/library/mac/documentation/graphicsimaging/reference/CGAffineTransform/Reference/reference.html


     //组件
     CCComponent* getComponent(const char *pName) const;
     virtual bool addComponent(CCComponent *pComponent);
     virtual bool removeComponent(const char *pName);
     virtual bool removeComponent(CCComponent *pComponent);
     virtual void removeAllComponents();//组件是通过CCComponentContainer *m_pComponentContainer来管理组织的,具体看CocoStudioComponentsTest例子
以上就是CCNode的相关源码,下面就以CCNode相关例子,来进一步理解CCNode相关属性.
1.setSkewX,setSkewY,setRotationX,setRotationY,setRotation相关设置属性的区别:
![]()
由上图可得出这么个结论:SkewX为平行x轴顺时针的变形,SkewY为平行y轴逆时针的变形。skewX仅使元素在水平方向扭曲变形,skewY(y)仅使元素在垂直方向扭曲变形(Y轴扭曲变形)。RotationX跟SkewX类似是顺时针的变形,对于RotationY也是顺时针的变形,这点与SkewY明显不同,对于Rotation也是顺时针的变形。
###2.CameraCenterTest-代码
sprite = CCSprite::create("Images/white-512x512.png");//创建一个512x512图片大小的精灵
addChild( sprite, 0);
sprite->setPosition(ccp(s.width/2*1, s.height/2*1));
sprite->setColor(ccRED);                              //精灵颜色为红色
sprite->setTextureRect(CCRectMake(0, 0, 120, 120));//将纹理剪切成120*120
orbit = CCOrbitCamera::create(10, 1, 0, 0, 360, 0, 0);//可以通过CCOrbitCamera实习翻转的效果 ,参数对应于:旋转的时间、起始半径、半径差、起始z角、旋转z角差、起始x角、旋转x角差
sprite->runAction(CCRepeatForever::create( orbit ));

1.关于CameraCenterTest代码主要能学到512*512大小的精灵怎么剪切成120*120大小-setTextureRect
2.怎么给精灵上色-setColor
3.通过CCOrbitCamera实现翻转的效果
###3.Test2之anchorPoint and children相关代码解析
CCSprite *sp1 = CCSprite::create(s_pPathSister1);
CCSprite *sp2 = CCSprite::create(s_pPathSister2);
CCLabelTTF *ttf1=CCLabelTTF::create("我添加在sp1", "Arial", 14);
CCLabelTTF *ttf2=CCLabelTTF::create("我添加在sp2", "Arial", 14);

sp1->setPosition(ccp(100, s.height /2 ));
sp2->setPosition(ccp(380, s.height /2 ));
addChild(sp1);
addChild(sp2);
sp1->addChild(ttf1);//将ttf1添加到sp1
sp2->addChild(ttf2);//将ttf2添加到sp2

CCActionInterval* a1 = CCRotateBy::create(2, 360);//设置旋转动作
CCActionInterval* a2 = CCScaleBy::create(2, 2);//放大缩小动作
CCAction* action1 = CCRepeatForever::create( CCSequence::create(a1, a2, a2->reverse(), NULL) );//CCSequence按先后顺序运行a1,a2,a2->reverse,再通过CCRepeatForever一直重复这个动作
CCAction* action2 = CCRepeatForever::create(CCSequence::create((CCActionInterval*)(a1->copy()->autorelease()), (CCActionInterval*)(a2->copy()->autorelease()), a2->reverse(), NULL));

ttf1->setAnchorPoint(ccp(0.5, 0.5));//设置描点为0.5,0.5
ttf2->setAnchorPoint(ccp(1, 1));
sp2->setAnchorPoint(ccp(0,0));

sp1->runAction(action1);//ttf1同时也在做相应的动作
sp2->runAction(action2);
下面是Test2的静态效果图:
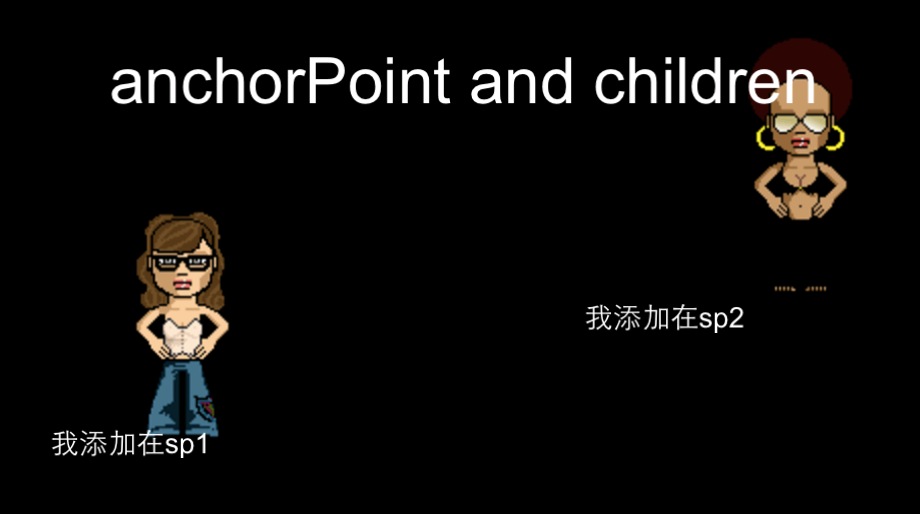
从上图可以看出在CCSprite上添加Node的时候,默认position是(0,0)
###4. Test4之tags相关代码解析 … schedule( schedule_selector(Test4::delay2), 2.0f); //定时器,两秒钟之后运行delay2方法 schedule( schedule_selector(Test4::delay4), 4.0f); //定时器,两秒钟之后运行delay4方法 … void Test4::delay4(float dt) { unschedule(schedule_selector(Test4::delay4)); //解除该定时器 removeChildByTag(3, false);//通过tag,将该node remove } 该例子主要是为了学习通过tag获取node:getChildByTag(2),以及通过tag移除node:removeChildByTag(3,fakse)
###5.Test5之remove and cleanup … CCAction* forever = CCRepeatForever::create(CCSequence::create(rot, rot_back, NULL)); CCAction* forever2 = (CCAction*)(forever->copy()->autorelease()); forever->setTag(101);//forever这个动作设置tag为101 forever2->setTag(102);//forever2设置tag为102 … schedule( schedule_selector(Test5::addAndRemove), 2.0f); //在addAndRemove方法中
CCNode* sp1 = getChildByTag(kTagSprite1);//通过tag获取node
CCNode* sp2 = getChildByTag(kTagSprite2);
CCAction* forever2=sp2->getActionByTag(102);//此时获取的forever2不为空
sp1->retain();//让其m_uReference加1
sp2->retain();

removeChild(sp1, false);//移除了sp1,但没有移除动画
removeChild(sp2, true);//当为true的时候,停止动画,并且移除动画,注意此时其子类的动画也被移除

// CCAction* forever1=sp1->getActionByTag(101);//此时获取到的forever1不为空,虽然removeChild,但是没有移除动画
// CCAction* forever3=sp2->getActionByTag(102);//此时获取到的forever3为空,因为在removeChild(sp2, true)中已经移除了清空了该action

addChild(sp1, 0, kTagSprite1);
addChild(sp2, 0, kTagSprite2);

sp1->release();
sp2->release();
###6.StressTest1之no crashes/StressTest2之no leaks
在StreessTest1中
...
schedule( schedule_selector(StressTest1::shouldNotCrash), 1.0f);//定时器运行shouldNotCrash方法

在shouldNotCrash方法中

unschedule(schedule_selector(StressTest1::shouldNotCrash));//移除定时器

 CCNode* explosion = CCParticleSun::create();//CCParticleSun粒子系统,后期再学习
((CCParticleSun*)explosion)->setTexture(CCTextureCache::sharedTextureCache()->addImage("Images/fire.png"));//CCTexture2D通过sharedTextureCache获取,在这里我们也了解到可以通过图片的名称来创建一个纹理类CCTexture2D * CCTextureCache::addImage(const char * path)

runAction( CCSequence::create(CCRotateBy::create(2, 360),CCCallFuncN::create(this, callfuncN_selector(StressTest1::removeMe)), NULL) );//这个CCLayer运行action,2秒后运行removeMe方法

接下来看removeMe方法,这里是StreeTest的重点,区别StreeTest1和StreeTest2之间这么removechild

getParent()->removeChild(node, true);//通过获取Parent来removeChild

在StreessTest2中
...
CCLayer* sublayer = CCLayer::create();//创建CCLayer
CCSprite *sp1 = CCSprite::create(s_pPathSister1);
sp1->setPosition( ccp(80, s.height/2) );

CCActionInterval* move = CCMoveBy::create(3, ccp(350,0));//继续移动ccp(350,0)
CCActionInterval* move_ease_inout3 = CCEaseInOut::create((CCActionInterval*)(move->copy()->autorelease()), 2.0f);//精灵移动速度由快至慢
CCActionInterval* move_ease_inout_back3 = move_ease_inout3->reverse();//精灵移动速度还是由快至慢,但是继续移动是ccp(-350,0),因为CCMoveBy->reverse()实现是CCMoveBy::create(m_fDuration, ccp( -m_positionDelta.x, -m_positionDelta.y))
CCSequence* seq3 = CCSequence::create( move_ease_inout3, move_ease_inout_back3, NULL);
sp1->runAction( CCRepeatForever::create(seq3) );
sublayer->addChild(sp1, 1);//将sp1加入到sublayer中
...
schedule(schedule_selector(StressTest2::shouldNotLeak), 6.0f);//定时器,6秒以后运行shouldNotLeak

addChild(sublayer, 0, kTagSprite1);//将CCLayer加入到父类中,tag为kTagSprite1

shouldNotLeak实现方法

unschedule( schedule_selector(StressTest2::shouldNotLeak) );//移除定时器
CCLayer* sublayer = (CCLayer*)getChildByTag(kTagSprite1);//通过kTagSprite1获取CCLayer
sublayer->removeAllChildrenWithCleanup(true); //移除CCLayer上的子类
关于CCActionEase:http://www.cnblogs.com/cocos2d-x/archive/2012/03/13/2393898.html
###7.CameraZoomTest之Camera Zoom test
// LEFT
sprite = CCSprite::create(s_pPathGrossini);
addChild( sprite, 0);
sprite->setPosition( ccp(s.width/4*1, s.height/2) );
cam = sprite->getCamera();
cam->setEyeXYZ(0, 0, 415/2);//设置视角位置坐标
cam->setCenterXYZ(0, 0, 0);//设置目标位置坐标

// CENTER
sprite = CCSprite::create(s_pPathGrossini);
addChild( sprite, 0, 40);
sprite->setPosition(ccp(s.width/4*2, s.height/2));


// RIGHT
sprite = CCSprite::create(s_pPathGrossini);
addChild( sprite, 0, 20);
sprite->setPosition(ccp(s.width/4*3, s.height/2));

m_z = 0;
scheduleUpdate();

在Update()方法中

m_z += dt * 100;

int t;
srand(time(0));       //根据系统时间设置随机数种子
t = rand() % 1000+ 1;       // 取得区间[1,N+1)的整数

sprite = getChildByTag(20);
cam = sprite->getCamera();
cam->setEyeXYZ(0, 0, t);//通过获取随机值,设置观察点

sprite = getChildByTag(40);
cam = sprite->getCamera();
cam->setEyeXYZ(0, 0, -m_z);  //正数负数的效果一样
CCCamera的相关知识看:http://blog.csdn.net/yangyu20121224/article/details/9420273 该例子主要是通过改变观察点,观察sprite消失以及出现的变化
###8.NodeOpaqueTest以及NodeNonOpaqueTest 不管是NodeOpaqueTest还是NodeNonOpaqueTest例子,都是为了测试OpenGL的颜色混合功能:
for (int i = 0; i < 50; i++)
{
    background = CCSprite::create("Images/background1.png");
    ccBlendFunc blendFunc = {GL_ONE, GL_ONE_MINUS_SRC_ALPHA};//表示Sprite会覆盖下面的描绘,但如果有透明的地方,则会显示下面的色值
    background->setBlendFunc(blendFunc);
    background->setAnchorPoint(CCPointZero);
    addChild(background);
    //glEnable(GL_BLEND);开启颜色混合功能,默认是开启的
    //glDisable(GL_BLEND);关闭颜色混合功能
}

在NodeNonOpaqueTest中kCCBlendFuncDisable={GL_ONE, GL_ZERO};//则表示完全使用源颜色,完全不使用目标颜色,因此画面效果和不使用混合的时候一致(当然效率可能会低一点点)。如果没有设置源因子和目标因子,则默认情况就是这样的设置。但是如果Sprite本身有透明的地方,则透明的地方会变成黑色。因为此时不显示目标的颜色。即使透明度为0也没有意义。
下面就详细简素下OpenGl颜色混合。混合是什么呢?混合就是把两种颜色混在一起。具体一点,就是把某一像素位置原来的颜色和将要画上去的颜色,通过某种方式混在一起,从而实现特殊的效果。
要使用OpenGL的混合功能,只需要调用:glEnable(GL_BLEND);即可。
要关闭OpenGL的混合功能,只需要调用:glDisable(GL_BLEND);即可。
注意:只有在RGBA模式下,才可以使用混合功能,颜色索引模式下是无法使用混合功能的
#####源因子和目标因子 前面我们已经提到,混合需要把原来的颜色和将要画上去的颜色找出来,经过某种方式处理后得到一种新的颜色。这里把将要画上去的颜色称为“源颜色”,把原来的颜色称为“目标颜色”。
OpenGL 会把源颜色和目标颜色各自取出,并乘以一个系数(源颜色乘以的系数称为“源因子”,目标颜色乘以的系数称为“目标因子”),然后相加,这样就得到了新的颜 色。(也可以不是相加,新版本的OpenGL可以设置运算方式,包括加、减、取两者中较大的、取两者中较小的、逻辑运算等,但我们这里为了简单起见,不讨 论这个了)

下面用数学公式来表达一下这个运算方式。假设源颜色的四个分量(指红色,绿色,蓝色,alpha值)是(Rs, Gs, Bs,  As),目标颜色的四个分量是(Rd, Gd, Bd, Ad),又设源因子为(Sr, Sg, Sb, Sa),目标因子为(Dr, Dg, Db,  Da)。则混合产生的新颜色可以表示为:(Rs*Sr+Rd*Dr, Gs*Sg+Gd*Dg, Bs*Sb+Bd*Db, As*Sa+Ad*Da)当然了,如果颜色的某一分量超过了1.0,则它会被自动截取为1.0,不需要考虑越界的问题。
源因子和目标因子是可以通过glBlendFunc函数来进行设置的。glBlendFunc有两个参数,前者表示源因子,后者表示目标因子。这两个参数可以是多种值,下面介绍比较常用的几种。
GL_ZERO:     表示使用0.0作为因子,实际上相当于不使用这种颜色参与混合运算。
GL_ONE:      表示使用1.0作为因子,实际上相当于完全的使用了这种颜色参与混合运算。
GL_SRC_ALPHA:表示使用源颜色的alpha值来作为因子。
GL_DST_ALPHA:表示使用目标颜色的alpha值来作为因子。
GL_ONE_MINUS_SRC_ALPHA:表示用1.0减去源颜色的alpha值来作为因子。
GL_ONE_MINUS_DST_ALPHA:表示用1.0减去目标颜色的alpha值来作为因子。

除 此以外,还有GL_SRC_COLOR(把源颜色的四个分量分别作为因子的四个分量)、GL_ONE_MINUS_SRC_COLOR、 GL_DST_COLOR、GL_ONE_MINUS_DST_COLOR等,前两个在OpenGL旧版本中只能用于设置目标因子,后两个在OpenGL 旧版本中只能用于设置源因子。新版本的OpenGL则没有这个限制,并且支持新的GL_CONST_COLOR(设定一种常数颜色,将其四个分量分别作为 因子的四个分量)、GL_ONE_MINUS_CONST_COLOR、GL_CONST_ALPHA、 GL_ONE_MINUS_CONST_ALPHA。另外还有GL_SRC_ALPHA_SATURATE。新版本的OpenGL还允许颜色的alpha值和RGB值采用不同的混合因子

举例来说:如果设置了glBlendFunc(GL_ONE, GL_ZERO);,则表示完全使用源颜色,完全不使用目标颜色,因此画面效果和不使用混合的时候一致(当然效率可能会低一点点)。如果没有设置源因子和目标因子,则默认情况就是这样的设置。

如果设置了glBlendFunc(GL_ZERO, GL_ONE);,则表示完全不使用源颜色,因此无论你想画什么,最后都不会被画上去了。(但这并不是说这样设置就没有用,有些时候可能有特殊用途)

如果设置了glBlendFunc(GL_SRC_ALPHA, GL_ONE_MINUS_SRC_ALPHA);,则表示源颜色乘以自身的alpha 值,目标颜色乘以1.0减去源颜色的alpha值,这样一来,源颜色的alpha值越大,则产生的新颜色中源颜色所占比例就越大,而目标颜色所占比例则减 小。这种情况下,我们可以简单的将源颜色的alpha值理解为“不透明度”。这也是混合时最常用的方式,默认的CCSprite,就是这样设置的。

如果设置了glBlendFunc(GL_ONE, GL_ONE);,则表示完全使用源颜色和目标颜色,最终的颜色实际上就是两种颜色的简单相加。例如红色(1, 0, 0)和绿色(0, 1, 0)相加得到(1, 1, 0),结果为黄色。

***注意:所谓源颜色和目标颜色,是跟绘制的顺序有关的。假如先绘制了一个红色的物体,再在其上绘制绿色的物体。则绿色是源颜色,红色是目标颜色。如果顺序反过来,则红色就是源颜色,绿色才是目标颜色。在绘制时,应该注意顺序,使得绘制的源颜色与设置的源因子对应,目标颜色与设置的目标因子对应。不要被混乱的顺序搞晕了。在cococs2d-x中,先visit的是目标颜色,后visit的是源颜色
Cocos2d中使用颜色混合:http://blog.sina.com.cn/s/blog_7a2ffd5c0100xtid.html
cocos2d-x 精灵遮罩:http://blog.csdn.net/qq51931373/article/details/9141979
以上就是NodeTest.cpp的相关解析,下面将主要讲解SceneTest.cpp,敬请关注。。。
青春是一场大雨,即使感冒了,还盼回头再淋一次... ...微笑永远是一个人身上最好看的东西...